FSX Analog Mini Panel
 Analog Mini Panel version 2.1. The analog mini panel has been updated with several bug fixes and minor enhancements. A major update to Karol Chlebowski's Pave Tack system has been added to this version. Additional documentation on the use of Pave Tack is included. You do not need to download the ...
- Download hits
- 1.9K
- Compatibility
- Microsoft Flight Simulator X (FSX) including Steam Edition & Prepar3D (P3D)
- Filename
- fsx_analog_minipanel_v2_1.zip
- File size
- 7.81 MB
- Virus Scan
- Scanned 18 days ago (clean)
- Access to file
- Free (Freeware)
- Content Rating
- Everyone
Rated 5 out of 5 stars by 1 PRO members.
Analog Mini Panel version 2.1. The analog mini panel has been updated with several bug fixes and minor enhancements. A major update to Karol Chlebowski's Pave Tack system has been added to this version. Additional documentation on the use of Pave Tack is included. You do not need to download the previous version; everything you need is in this update. By Bill McClellan.
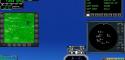
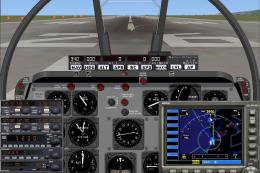
Analog Mini Panel.
Please read this entire file as it covers some specific installation instructions and the installation of third-party gauges. Some operational tips and references are included.
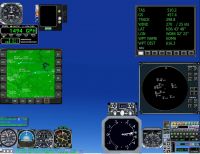
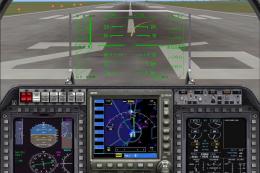
Version 2.1 Analog Mini Panel has been updated with many new pop-up windows to help improve visibility on the main mini panel screen, plus add additional new functionality. This is an entirely new panel so you do not need to download my previous version. A pop-up Glass Cockpit panel has been added to this version. A new version of Pave Tack addon gauge by Karol Chlebowski has been added that is spectacular.
[FSX INSTALLATION]
1) Backup the minipanel.cfg file in the "\Program Files\Microsoft Games\Microsoft Flight Simulator X\Gauges" folder so that you can change back to it if you need to.
2) Open the Gauges folder in the FSX_Analog_MiniPanel.zip and copy the contents into "\Program Files\Microsoft Games\Microsoft Flight Simulator X\Gauges". Yes to any overwrite message. If in doubt then backup the original gauge first!
NOTE: Two TCAS systems are available for this version. The reason for this is several simmers reported a Crash-to-Desktop (CTD) issue with my previous version running FSX in the full screen mode (Alt-Enter).
If you use full screen mode (Alt-Enter) then goto step 3 and skip step 4.
If you like the ILH TCAS with the Vertical Velocity Indicator type gauge and you don't operate in Full Screen mode then goto step 4.
You can install both TCAS gauges if you prefer. They do run fine with both installed except for the full screen issue in the ILH TCAS gauge. (see issues below)
3) Copy the TCAS folder and its contents into "\Program Files\Microsoft Games\Microsoft Flight Simulator X\Gauges" folder.
4) Open the folder called ILH TCAS in the .zip file and copy TCAS2v7.dll and TCAS2v7.ini files into "\Program Files\Microsoft Games\Microsoft Flight Simulator X\" which is your main FSX folder. Copy TrafficInfo.dll into "\Program Files\Microsoft Games\Microsoft Flight Simulator X\Addon Modules" folder. Yes to any overwrite message. If in doubt then backup the original gauge first!
[USAGE]
To access the minipanel from the main 2d panel press the “W” key. To return to the main panel press the “W” two more times. You cannot access this mini panel from the 3d virtual panel.
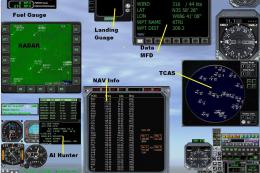
Most of the gauges on the panel are self explanatory but I will describe or reference information on some of the more complex but very useful gauges on the minipanel. There is a icon tower in the lower right hand portion of the mini panel that will access the pop-up windows. These pop-up windows can be resized and moved on the screen to where ever you desire.
If you click the center of any of the primary flight gauges they will be enlarge. Click in the center again to close the expanded gauge.
The informational gauges for nearest airports and navigational information are transparent and sometimes the information is difficult to read in certain lighting conditions. If you click on either informational gauge it will add a black background that allows for easier visibility. I wanted to provide as much visibility as possible on the mini panel that is why it was made them transparent. Since these are transparent it can be a bit difficult to find the "hot spot" to click. You will need to click on one of the letters or numbers. With a little expermentation you will find where its easiest to click and bring up the data with a black background. Once the black background is up click on it again to return to a transparent state.
1) The TFR gauge by Karol Chlebowski allows you to fly Terrain Following at any altitude you desire. It works well down to 100 feet above the ground in flat and rolling terrain. In very mountainous areas you probably should not fly below about 800 ft. Occasionally you will have to take manual control of the aircraft in the mountains to pass safely across. Karol is working to solve this problem but even so this is a really fun gauge.
All you need to do is:
1.Set the altitude above the ground you like to fly in the altitude window of the autopilot.
2.Click the TFR gauge near the lower right corner of the minipanel.
3.Turn on the autopilot and click the ALT button and you’re off.
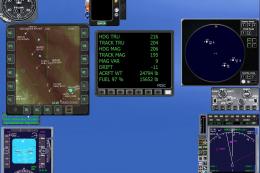
2) The Pave Tack gauge by Karol Chlebowski is an outstanding add-on that lets you scan outside the cockpit in any direction plus up and down. You can also view from different preset altitude perspectives by clicking the up/down arrows on the left side of the Pave Tack gauge. A zoom in/zoom out function is also included. I think most simmers will really like this gauge. Click the PT icon in the icon tower to display Pave Tack.
I highly encourage you to download Karol's latest update from AVSIM or FlightSim. The documentation for these gauge and several other of Karol's panels and gauges is outstanding. Search for the file name fxpiggb6.zip on either site.
3) Also download Dietmar Loleit's tcas_and_traffic_display_v1.0.zip from AVSIM. There is very good documentation on the usage this gauge in the zip. I know several people had issues with the TCAS gauge in my previous mini panel for FSX so I changed to Dietmar's new gauge. To execute the TCAS pop-up click on the TCAS panel light at the top of the ICON tower.
4) Download Edi Hirsch's nav-info.zip from AVSIM or Flightsim for documentation on the Nav-Info gauges. They are executed by the two transparent icons on the icon strip in the lower right hand corner of the panel.
5) The Throttle and Radio Icons are dependant on the aircraft you are flying. They may not work on some aircraft but will work on others.
NOTE: If the aircraft you are flying already has a mini panel (most of the Microsoft default aircraft have them) you can disable them and use my mini panel if you so choose. Go to the aircrafts panel folder and open panel.cfg file with notepad. The list of window names is at the top of the page. Simply put // in front of any window named Mini Panel (name may vary). Example: //Window06=Mini Panel. If you decide to go back to the default Mini Panel just remove the //. The name and number may be different in each panel.cfg file.
[ISSUES]
The Alt-Enter (Full Screen command) will cause Crash to Desktop (CTD). It is caused by a problem with the ILH TCAS gauge. I left it in because many people do not use (Alt-Enter) full screen and liked the gauge. If you want to change I will recommend a stock vertical velocity gauge as a work around.
First open minipanel.cfg file with notepad and comment out gauges 47 and 48 in [MiniPanel00] as shown below:
//gauge47=ILH_TCAS!IVSI, 606,635,121,133,fontscale:0.9 other:95
//gauge48=ILH_TCAS!Logic, 0,0,1,1,trafficinfo:yes volume:-200
Remove the // from in front of gauge 49 as shown below:
gauge49=MiniPnl!Vertical Speed, 629,644,95,96
Save the file.
[Future Updates]
This is a work in progress so feel free to contact me if you have any suggestions or comments.
[CREDITS AND ACKNOWLEDGEMENTS]
• Thanks to Karol Chlebowski for the use of the very impressive Pave Tack, TFR, On Speed, Autopilot, Data MFD, Radar Altitude, E-Trim, and SALv9 gauges.
• Thanks to Lee Hetherington for his TCAS gauge.
• Thanks to Dietmar Loleit's for his new TCAS gauge.
• Thanks to Glenn Copeland for his extremely functional Cockpit Commander gauge.
• Thanks to Edi Hirsch for his Nav-Info gauge.
• Thanks to Robert K. Guy for his fuelstat gauge.
• Thanks to Ed Struzynski for FS Panel Studio, which was used to assemble this panel.
DISCLAIMER
There is no warranty or guarantee of any kind, expressed or implied, for any problems whatsoever resulting from the use of this software (though it’s very unlikely). The user assumes all risk related to the use of these files.
Bill McClellan
Images & Screenshots


The archive fsx_analog_minipanel_v2_1.zip has 27 files and directories contained within it.
File Contents
This list displays the first 500 files in the package. If the package has more, you will need to download it to view them.
| Filename/Directory | File Date | File Size |
|---|---|---|
| Analog_Panel.jpg | 10.13.10 | 174.45 kB |
| Analog_w_popups.jpg | 10.13.10 | 355.96 kB |
| readme.txt | 07.05.11 | 8.25 kB |
| Gauges | 07.05.11 | 0 B |
| 737-400.dll | 09.26.07 | 2.33 MB |
| 737-400.gau | 05.01.07 | 2.20 MB |
| Bell_206B.dll | 09.26.07 | 2.05 MB |
| CONCORDE.GAU | 04.12.07 | 3.60 MB |
| ILH_TCAS.gau | 11.07.04 | 696.00 kB |
| MiniPanel.cfg | 06.29.11 | 17.51 kB |
| MiniPnl.cab | 06.29.11 | 7.35 MB |
| Mooney_Bravo.dll | 09.26.07 | 3.17 MB |
| Pave Tack.cab | 07.05.11 | 633.89 kB |
| RKG_fuelstat.gau | 04.12.07 | 601.50 kB |
| SimIcons.cab | 09.26.07 | 23.03 kB |
| ILH_TCAS | 08.30.10 | 0 B |
| TCAS2v7.dll | 05.23.04 | 152.00 kB |
| TCAS2v7.ini | 05.16.04 | 98 B |
| TrafficInfo.dll | 03.21.04 | 7.50 kB |
| TCAS | 10.11.10 | 0 B |
| Sound.ini | 09.01.10 | 204 B |
| sound3.dll | 03.08.08 | 111.68 kB |
| TCAS_Alert.wav | 03.01.06 | 20.62 kB |
| TCAS_Warn.wav | 12.31.06 | 28.52 kB |
| Pave Tack Notes.doc | 06.16.11 | 327.50 kB |
| flyawaysimulation.txt | 10.29.13 | 959 B |
| Go to Fly Away Simulation.url | 01.22.16 | 52 B |
Installation Instructions
Most of the freeware add-on aircraft and scenery packages in our file library come with easy installation instructions which you can read above in the file description. For further installation help, please see our Flight School for our full range of tutorials or view the README file contained within the download. If in doubt, you may also ask a question or view existing answers in our dedicated Q&A forum.

1 comments
Leave a ResponseThe content of the comments below are entirely the opinions of the individual posting the comment and do not always reflect the views of Fly Away Simulation. We moderate all comments manually before they are approved.
Hey,
I'd like to change the symbols used in the TCAS widgets so that they are dependent on the type of aircraft. I.e i'd like a different set of symbols for UAVs. How can i do this? I have basic knowledge in programming.
Thanks,
Mike