FS2004 FSCamera 1.4. Allows you to move the tower view at will, offering more interesting views of your aircraft in flight. By Gunnar Daehling. (Previous version had 4109 downloads.)
1. Preliminary note
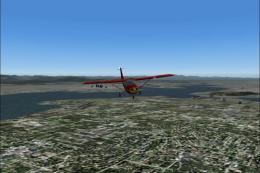
Many users of the Microsoft Flight simulator surely know the additional program "Active Camera".
It was freeware till now, what has changed with the version 2004. I have enjoyed using it also
very much, it otherwise changes this one anyway for almost useless control tower view in
magnificent camera prospects. Since I deal with smaller program projects now and then in my
leisure time, I simply have tried out once to move the control tower view with a Visual-BASIC
program. I have used the interface "FDSConnection" by Flight Deck Software.
Since the first attempts were quite promising, I have carried on and developed the program
published here. I think that it hasn't become a simple copy the "Active Camera". Although the
basic idea surely is derived, I have changed something anyway.
This one is an essential difference that one cannot provide any particular time interval for
converting the camera. Converting is carried out, i.e. the camera is placed with an adjustable
distance and an angle to the aircraft "distance steered". The location is changed first if the
distance is worth aircraft camera more greatly than this value. Through this it is possible to
fly a turn around the camera without which this hers changes location (in a corresponding
distance choice). Originally I also wanted to include the height difference in the distance
calculation, however, have remarked at the tests that this isn't absolutely necessary at all.
With corresponding setting values one can watch a complete loop-the-loop over or under the
camera. It is also possible put the camera point of view in the center of the loop-the-loop
(by suitable flight movements).
I have introduced a function with the version 1.5, with what it is possible to install the
camera tightly at arbitrary times. If the mouse pointer is moved into the proximity of the
right display edge, the camera not changes her position any more. This also happens if the
mouse is led to the left display edge. However, there is an essential difference: the camera
is put on a larger distance. The distance gets all the larger the further the mouse pointer
approaches the upper display edge. The camera fixation is canceled if the mouse pointer is
led away by the display edge.
Furthermore I have planned more parameters for the free adjusting. The effect of the single
values can by try out find out best. I will give a fundamental explanation below.
2. Installation
The installation is made by executing the Setup_FS_Search.exe (FS 2004 mustn't run). The FS
path gets sought-after and predefined automatically. If this shouldn't be the case, he must
be adjusted manually. FSCamera only works when the fs9.exe is found there. Names (e.g.
fs9_patch.exe) being similarly aren't accepted. The FSCamera.exe became FDSConnection.dll by
the setup program into the main directory of the FS2004 copied (selected at the installation)
and the file into the sub-folder /module.
As of the version 1.5 the program is started directly in the FS menu (entry FSC). For this I
use MyFsMenu from for http://www.elbiah.de/flusi/. I would like to thank Jürgen Haible in this
place, it will well as well do all users of the program.
The call is required for the first start from the menu. After this the program can be brought
to the foreground oldly either by the menu call or by the key combination ALT+TAB.
FS Camera permanently runs in the background. Since the program, however, exclusively works
with timer objects, it hardly influences the performance of the simulator. As long as the
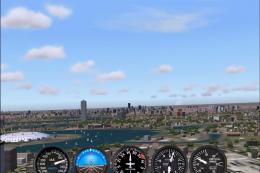
program runs, the control tower view is changed according to the settings (also in the
immediately repetition). I recommend a zooming factor of 1.5-2 for this view (setting is
carried out under view/view options or with+/-). Key becomes with the <backspace> put the
zooming factor on the value 1.0.
To change settings, FSCamera is taken to the foreground. With a click on the button "Flight
simulator" it goes back into the simulator again.
FSCamera ends himself with the flight simulator automatically.
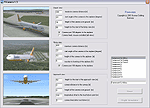
3. Setting values
The range of values of the individual fields is shown if one is over these with the mouse. If
faulty values are entered, they are corrected when leaving the field. One should take into account
that some fields can get also negative values. Following a short description of the scheduled
entry fields.
Airport view
[maximum camera distance]
distance between camera and aircraft on the airfield and on the runway
[ start angle of the camera to the airplane ]
angle between camera and aircraft at the beginning of the sequence. An angle of 0 degrees meant,
that the camera is directly on the direction of flight axis (approaching at least: it can give
deviations at some places of the world, at certain flight speeds and course directions. The
exact correction for all flight configurations was the greatest problem at the development of the
program. Due to the ball form of the earth several correction functions which is superimposed
are required). Positive values mean camera view of the front on the left, negative of the front
on the right.
[height of the camera over ground]
height of the camera over the airport area
[ height for the start of the fly-by view ]
when exceeding this height mode changed view in the Fly- by automatically
Fly-by view
[maximum camera distance]
distance between camera and aircraft without consideration of the height difference
[ start angle of the camera to the airplane ]
see above
[ height of the camera to the airplane]
height difference of the camera to the aircraft. Positive and negative values are permitted here
[reaction to banking of the airplane]
can hereby be influenced the behavior of the camera at the turn flight. A value of 0% changes
nothing. 100% mean, that is added to the initial angle of the camera position of the angles of
the banking (example: initial angles of the camera 30 degree, banking of the aircraft 10 degrees
yield an initial adjusting of the camera of 20 degrees) to the left. Since there also are aerial
maneuvers which a banking of the aircraft doesn't mean any turn or a certain banking at every
flight speed yields another turn radius, this value lets himself adjust in whole percentage
points arbitrarily.
Approach view
[ height for the start the approach view ]
height for the automatic switch over on the approach view
[camera distance to the runway]
distance of the camera to the valued touchdown point to the runway measured in the right angle.
A positive value means distance to the right, a negative to the left in direction of flight seen.
The camera is set on the center line at the value 0 to the runway.
[height of The camera over ground]
see above
[ Longitudinal offset to the touchdown point ]
The camera is moved around this value in the direction of the runway. A positive value means in
direction of flight, a negative contrary to the direction of flight.
[ camera fixed after touchdown ]
the period of time which passes after touching down up to changing into the airfield mode
describes. The time of the touchdown only has to be roughly found out (particularly if the
aircraft jumps) since this status only all 0.5 s is checked. One finds the adjusting out by
try out best.
The touchdown point is found out by the evaluation of the approach mathematically. Of the last
sequence before switching over to the approach view the beginning and end-point gets connected
to an imaginary line whose intersection point determines the touchdown point with the runway
surface. Short-wave vibrations around the ideal approach course get relatively standardized by
this procedure well and the touchdown point is correct rather exactly.
An ILS approach with autopilot is the ideal case one gets it at corresponding setting values to
that the aircraft touches down exactly at the camera point of view, a magnificent play.
4. Liability exclusion
The program is freeware and may be used absolutely. The use particularly is carried out at its
own risk. Who doesn't accept this mustn't use the program.
5. Fault notes, reviews and suggestions
I publish the program in the form being here. Please, all indications of faults, reviews and
suggestions sends directly to me:
g.daehling@mdcc-fun.de
I wish all a lot of fun with the use of FSCamera.
 FS2004 Utilities/Misc
 FS2004 Utilities/Misc
 FS2004 Utilities/Misc
 FS2004 Utilities/Misc
 FS2004 Utilities/Misc
 FS2004 Utilities/Misc
 FS2004 Utilities/Misc
 FS2004 Utilities/Misc