
FSX: Steam Edition Released & Yes, You Can Use Freeware Addons
Microsoft Flight Simulator X: Steam Edition arrives with upgraded performance, updated netcode, and seamless mod support, uplifting the…
When we consider the above statement, it is tempting to imagine that someone has literally sawn off the front of a plane and dropped it into someone’s spare room complete with a comfy (and interactive) chair. The thing is, while perhaps a lot less dramatic, should your ambition be such, that first description isn’t far wrong.
By definition, a “home cockpit” is something for those who have taken the realism of their flight simulation to another level, and as such the more detailed and authentic, the better.
Indeed, some of the better setups perhaps rival, at least, many of the professional flight training simulators utilized by commercial airline companies and even the world’s military.
What’s more, there are entire websites devoted purely to building a home cockpit from which to fly your virtual missions. And, off the back of those websites, a tight-knit online community, who you can not only lean on for advice and ideas during your project but can then meet them in the virtual skies when complete.
In short, it would appear that owning and utilizing is perhaps the highest plateau to experience flight simulation.
This article is a full analysis of the home cockpit scene for flight simulation so because of that it's quite lengthy. For ease of reading, you can jump to individual sections using the contents links below;
While it isn’t perhaps the top of a lot of people’s shopping list, the fact is that should you wish to you can purchase virtually anything to do with the creation of a home cockpit for flight simulation.
From replica parts to genuine spares, right up to a full authentic cockpit delivered straight to your front door (well, almost), the skies – virtual or otherwise – really are the limit.
As with anything else, the Internet does not disappoint if you wish to begin building your own. Indeed, a quick search into Google will bring you results from all manner of online retailers.
Whether you wish to have the bare minimum, which for all intents and purposes could simply be a screen, chair and a desk with added fixtures, to a genuine replica with authentic parts and controls that would take up the size, should you wish, of an actual to-scale interior of a cockpit, that might also tilt, shake, and vibrate according to whatever virtual aerial maneuvers you happen to be performing at the time, all is available to at the click of a button, a transferring of funds, and a wait for the “goods” to arrive.
Of course, there are several ways to go about obtaining a cockpit, ranging from a complete self-build, a part build and part purchase, or to simply buying the entire thing, intact and pre-built for your ease.
As with everything else, the costs of such a project will vary depending on how authentic and realistic you wish to go with such a project, or how you wish to achieve it. That being said, if you are willing to spend time searching the internet, you can reduce costs somewhat without necessarily reducing standards.
For example, individual parts vary depending on what exactly you are wishing to purchase. For example, if we start with the Main Instrument Panel (MIP) you can most likely pick one up complete from a professional and dedicated company (of which there are several).
You can expect to pay a ballpark figure of $3500-$4500 for such this, but the advantage is that everything will be up to date, and even if there are extra purchases required you will be advised of this at the time of purchasing.
Building your own could be significantly cheaper – IF – you already have a lot of the tools required to cut wood and shape metal and all manner of things required in physically building anything. If you haven’t, then while you very well might pick up a lot of what you need for hundreds instead of thousands, you will still need to outlay a significant amount for such tools.
Furthermore, experienced or not, the project would be a long term one and not something you can just “knock up” in an afternoon. And remember, this is only the shell of the MIP – we haven’t thought about wiring and such yet.
In short, it would appear, unless you are already a gifted builder, with tools and an enjoyment of long term projects and the undoubted sense of achievement you will feel, it might be best for all others to look at purchasing at least the MIP already built and designed.
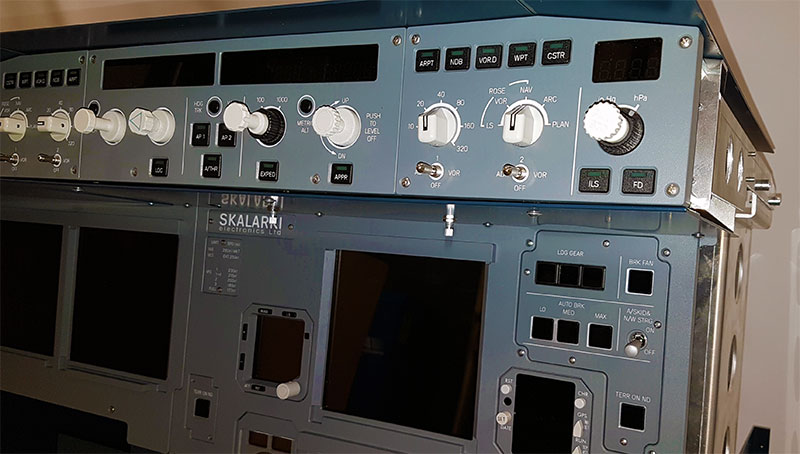
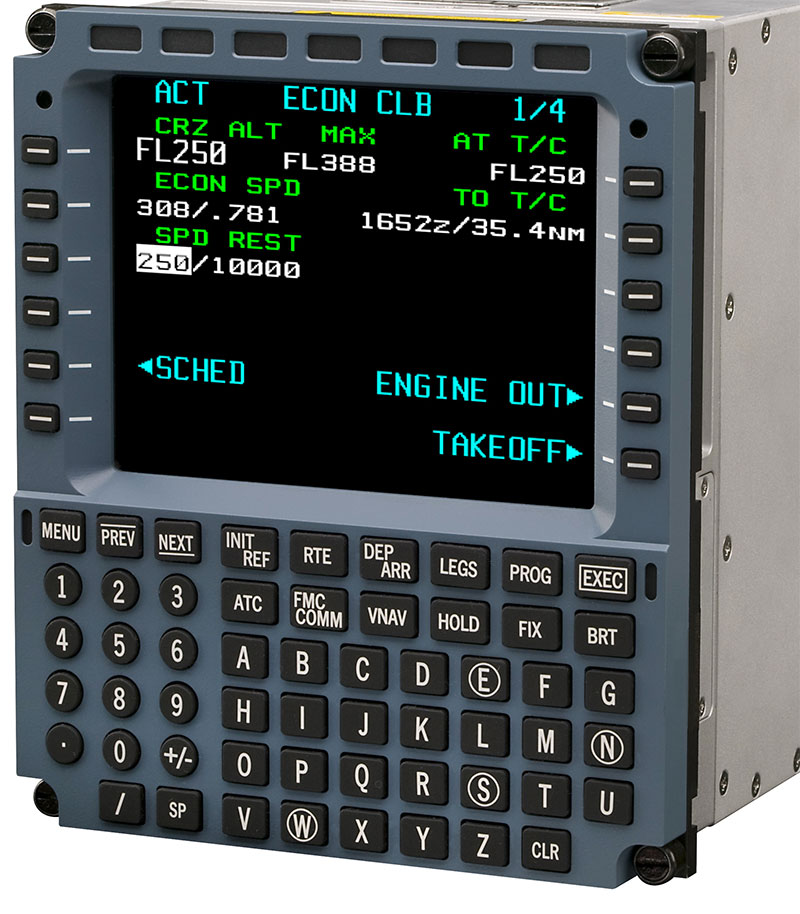
Once you have the shell – whether purchased or pieced together from scratch – you need to think about the control and computer systems. Such things as Mode Control Panels (MCP), the Control Display Unit (CDU), and the Electronic Flight Instrument System (EFIS) which essentially make up the Flight Management System (FMS).
As the above paragraph might sound, there is a significant amount of outlay that will revolve around this part of the project. Again, you can shop around, but you can expect to spend anywhere from several hundred to anywhere up £3000, maybe more.
Perhaps the most complicated – and once more, expensive – aspects of building a one is the Forward Overhead Panel which will likely set you back anywhere from $1000 for an extremely basic one, to (more likely) $7000 to $10,000, possibly even as high as $12,000 for a fully accurate and articulate design. And, if you attempt to build this yourself then you will need significant knowledge, not only in flight simulation and home cockpits but general electrical knowledge too.
This is another part that, barring significant experience or a simple desire to build from scratch, where a pre-built purchase may be the best option. And like the frame, it will be specifically designed and up to date.
While not as crucial as the Forward Overhead Panel, the AFT Overhead is significantly lower in cost. And furthermore, is not as complex as the former. This might be an area where even inexperienced builders may wish to build themselves. However, should you wish to purchase this pre-built, costs are generally between $2500-$3000.
OK, so now we come to the “fleshing out” the shell and basic panels and desk. For example, such things as Rudder Pedals, Yokes, and Throttle Quadrants. These are all areas where you can save significant money should you opt to build them yourself. Generally speaking, all of the aforementioned items could be built for between $500 to $1000. However, if you require to purchase these, particularly if brand new, you can expect to pay between $3000 to $5000 for each one. In short, if you are looking for an authentic experience, these are essential items.
And of course, even after that, you have – optional as they might be but essential for the realistic feel – such things as a base for it to sit on, the outer shell that will encase you in and contribute greatly to the overall authentic feel of sitting in an actual cockpit of a real airplane.

There is the option of purchasing a fully built version. Whether privately through someone simply looking to sell their own setup, or from a dedicated company. As you might imagine, however, just by adding up the rough figures above, you can expect to pay five figures for such a purchase. Indeed, as you might imagine, prices vary, but you can expect to pay anywhere from $18,000 to $27,000. And depending on where in the world you are at the time of the purchase you can expect to pay some significant shipping fees.
With all of those costs floating about, then, perhaps you do want to have a go at building your cockpit from scratch. And for such a niche pastime, there really is an active and responsive community available online where a builder can seek advice, plane, tutorials and eventually show-off their final achievements.
Of course, the drive behind flight simulation at whatever level you choose to enjoy and experience it at is realism and authenticity. And that drive is the same for those who look to build their own. In fact, you might argue that the whole reason for starting down the road of a home cockpit is to take such realism to as high a plateau as possible.
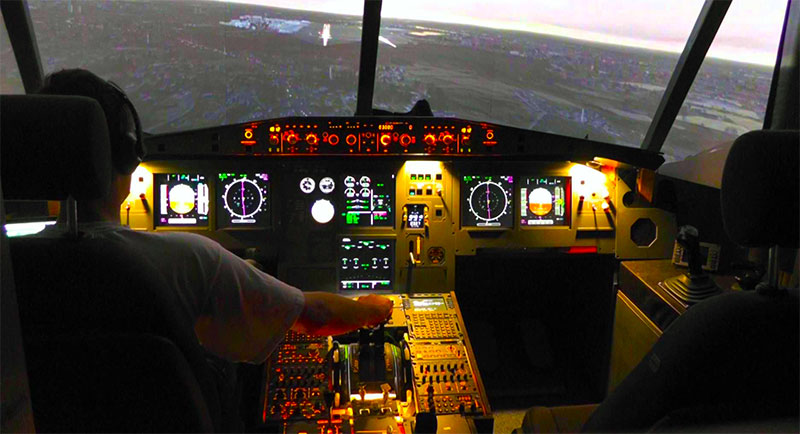
Indeed, once you are in position and looking forward ready to progress on your next virtual flight, for all intents and purposes, you are in your plane on the runway and ready for take-off. All from the comfort of your own home.
And whether for purely recreational or to perhaps build up such skills so as to transfer them from the virtual skies to the real ones, utilization of these set-ups will only increase a pilot’s skillset all the more.
And while we should always keep the line – and expectations – between recreational and professional perfectly clear, there does appear to be an increasing overlap between the two.
And this isn’t a bad thing, particularly for the recreational market, which as we have seen in previous articles is, at least in part, helping to drive the professional industry with its own desires, which, in turn, feed back to the recreational market. Indeed, the need for realism would appear to be feeding both markets – for the professionals it allows them to train as close as possible to the real thing without having to risk fatal errors in the air, while for the recreational user, it allows them to experience flying a multitude of aircrafts which, in reality, they simply wouldn’t be able to.
With all that said, then, let’s look at some examples of people who have indeed built their own. Starting with a piece of edit submitted by Fly Away Simulation’s very own, Ken Kirsch (username KanadaKen), who recalls not only his own experience in building a home cockpit but of his journey into the world of flight simulation in general.
Inspired by airplanes as a little boy back in the 50s, I'd look up to the sky every time I would hear the sound of a piston engine overhead. Living close to Toronto's Downsview (de Havilland) Airforce Base (CYZD). The old de Havilland, birthplace to the famous Beaver and Otter, now home to Bombardier Aerospace. I still live there, and the little airport in the "burbs" is slowly becoming a park in the city, but still manufactures some aircraft and is home to The Canadian Air & Space Museum.
As I grew up I built and flew model airplanes, .049 control-line flying and eventually full RC Model Flying. I have flown some real planes with friends and from time to time have gone up in fixed-wing Cessna's and helis, but never pursued my pilot's license due to a heart defect I was born with and a lack of money and time (excuses in my youth).
My interest was always still very strong but as I raised a family, my time became even more scarce to flying anything at all I had been flying "desktop sim" with Microsoft Flight Simulator, since the late 80s. But the graphics and quality were but mere lines on the screen. One really had to use one's imagination!
With my heart problems corrected in 1999, I would have probably passed my medicals, if not for 2 years later, coming down with "Meniere's Disease" (inner ear imbalance), which automatically disqualifies me from passing any pilots medicals! My hopes of ever becoming a pilot were gone!
Then in 2007 came Microsoft Flight Simulator Ten. Known as "FSX".
A platform that was far ahead of its time. No one had any computer that could get this program to run even close to it's maximum. The critics complained that this game was ridiculous on any machine of the day. It was also just a very basic program. The default scenery and special effects were minimal and allowed for multiple add-ons in layers of each other, working together instead of the traditional confliction of different add-ons.
Three years later Vista, Win 7, the newer i7's and faster graphics processors, scenery mesh, ground textures, terrain add-ons, weather, traffic, ATC, airport environments, ground environments, sounds, lights, aircraft, airport add-on's, etc....There are literally hundreds and hundreds of add-ons and Microsoft has opened up this market "sky-high"! All have made this experience a very realistic simulation that rivals most real static simulators used for professional world training.
With the addition of a Yoke, Rudder pedals and throttles, this made it seem even more realistic and easier to fly (instead of manipulating the mouse and keys on a desktop, etc...)
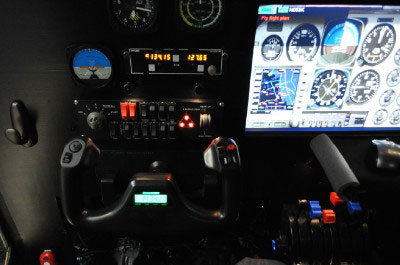
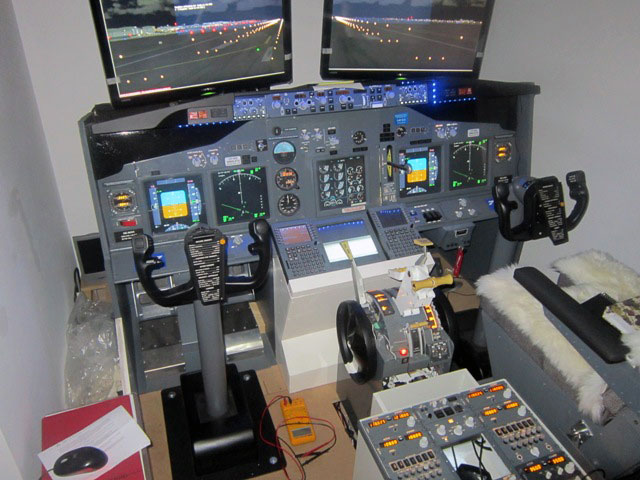
As technology fastly improved, I purchase the TripleHead toGo (TH2Go), a box that allows one to hook up three monitors all as one across your front view. With this technology, I decided that a cockpit dashboard would serve me well, as a fourth screen could be placed in the center of this dash, used as my instrument panel, etc... I also discovered a company called GoFlight that makes switch panels/modules for FSX. Just plug in (USB) and it acts as your real cockpit switches. I purchased the Autopilot, Communication, Nav Radios, Saiteks Starter/Gear Switch Panel, and more. Now I had a desktop simulator that was almost very real in its views out the windscreen and with real switches and gauges. The actions were very real.
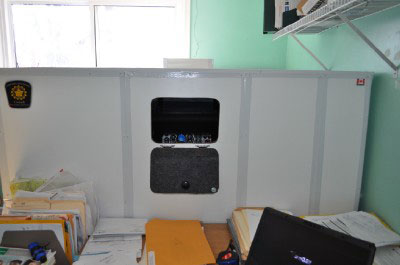
But this took up space around my office desk (my at home office), and the computer was being used for other applications at home and work. I needed a solution so I could have my full office desk back (new laptop), and space where I could get "Total Immersion" in my simulator.
I did a few sketches/designs as to the size and footprint it would take up. I knew I wanted a Two-Seater, so friends and family could take part in my enthusiasm. So a Two-Seat General Aviation Aircraft would be in order.
I found the Van seats from a guy "online" who even delivered the Two Captains chairs in mint condition for 100 bucks total! The 2 x 2 ribbing/skeleton, the seat platform, and the dashboard panel were all built within one week, part-time.
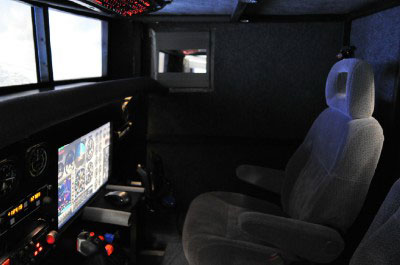
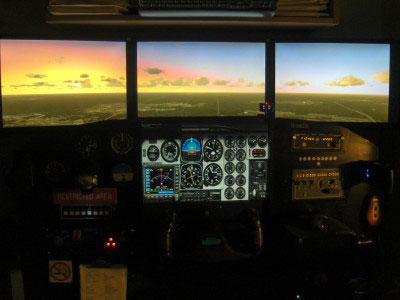
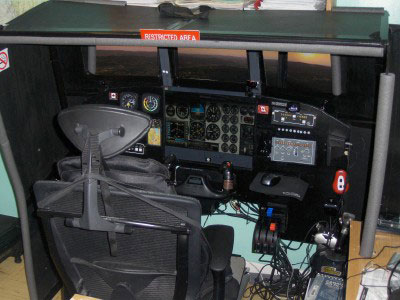
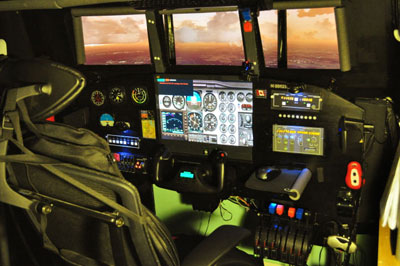
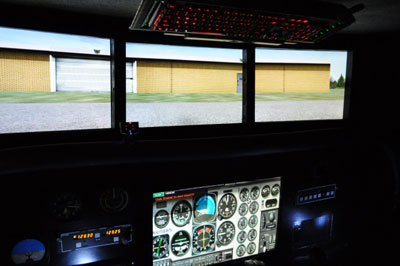
Construction was done in the small 12' x 15' office room while I still operated my business. It was like changing an engine while in flight. "Tight" would be an understatement. I mounted the three screens and built the bezel around them. After I installed all the white paneling walls, the entire interior was carpeted. The dials, modules, screens were all mounted and wired after the ribbing and dash were sanded and painted black... I made my own interior lighting system from low watt no-heat strings of Xmas lights that worked out great!
With a vibration system I made, Track IR head tracking and the all-new EZ Doc motion camera views, this SimPit is a Total Immersion Room with full static simulation functions. Total time to complete, about 20 days-part-time!
I can now fly the world over in total immersion and never leave my home, compromise my budget or my health and safety. My wife took her first ride last night with me in the right seat. Prince Rupert, BC. to Anchorage Alaska. She was totally immersed and impressed. She even experienced some slight nausea/motion sickness. Amazing!
The New Total Immersion SimPit by Ken Kirsch (KanadaKen), Truely a 21st Century "Holodeck" Hobby!
André Aepfelbach has been a Microsoft Flight Simulator aficionado since 1994. He started out with a keyboard, moved to a joystick, then graduated to yokes and pedals. He had everything he needed to get as close to real flying as possible.

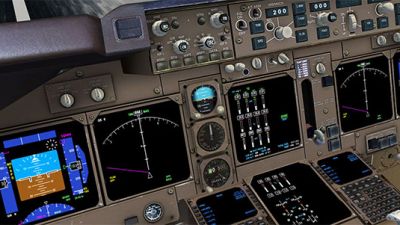
And yet, one bright sunny day he was approaching a landing in Tahiti when a series of errors forced him into the water. Later, reflecting on this unfortunate turn of events, he decided he needed more control.
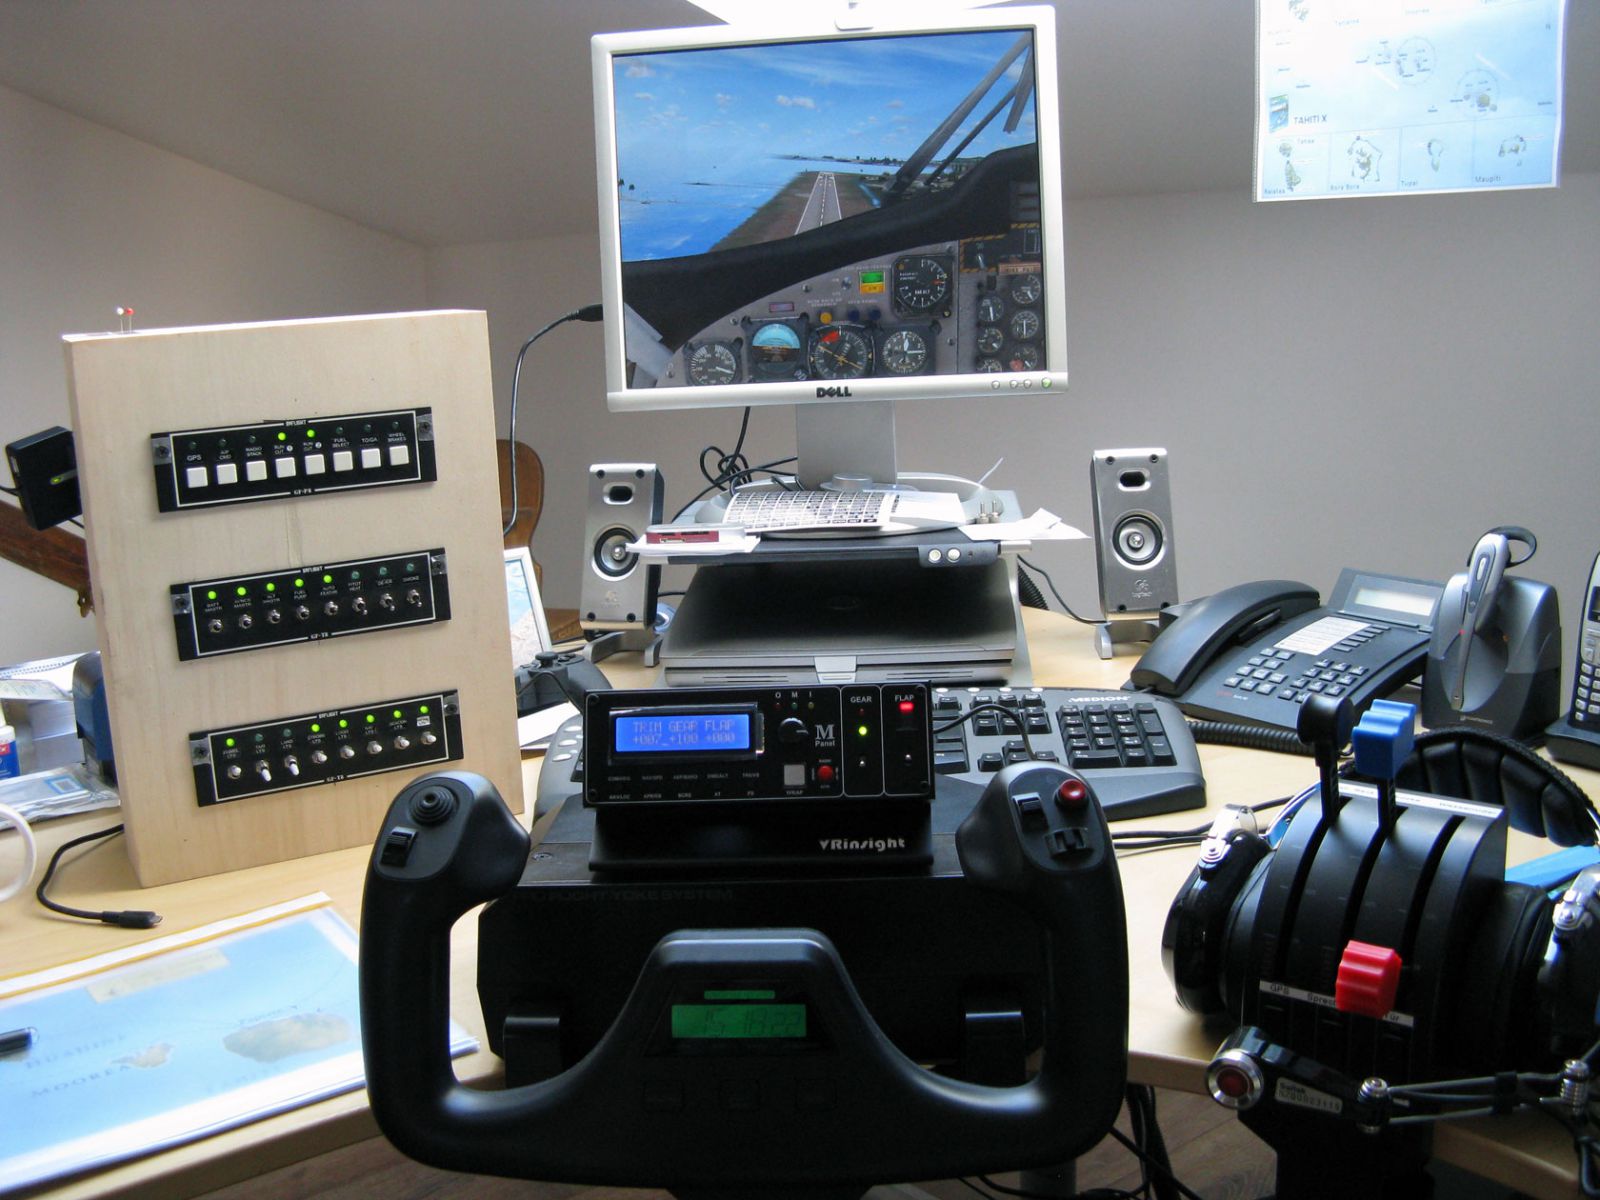
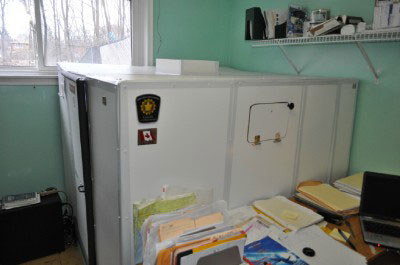
Andre's simulator set-up before he built his cockpit (above). He states, "The first picture shows how I was flying before and it clearly shows that a home cockpit was urgently needed".
He decided on his course of action. He was going to build his own.
A preliminary investigation revealed that Boeing 737 plans were the most common. But he didn’t want to build that kind of aircraft. In his soul, André was an island hopper. He wanted a “simpit” like the planes he likes to fly in real life. He drew up plans to build a flight simulator cockpit of a deHavilland DHC-6 Twin Otter, one of the most popular Microsoft Flight Simulator aircraft.
The DHC-6 Twin Otter is a Short Takeoff and Landing (STOL) utility plane originally created and developed by Canadian company deHavilland. It is currently being built by Viking Air. Distinguishing characteristics include a fixed tri-point landing carriage, very high rate of climb, and functional, no-frills look. It is a popular aircraft with skydiving companies, military paratroopers, cargo carriers, and regional airlines. It was perfect for André’s home cockpit adventure.
However, good ideas are easier to come up with than carry out. Creating one is a serious undertaking that takes a lot of planning. We are going to take a look at how he planned his project and brought it into being. If you’ve ever considered it yourself, you may get some good ideas.
First André drew up some initial plans. He researched on the internet and talked to people all over the world. His contacts lived everywhere from the US and Canada to far-flung locations like the Maldives and Seychelles. He reviewed and evaluated many different ways of building the cockpit. He created small paper mockups to test various ideas. The control is the most difficult piece to get right. He already had a Saitek Pro Flight Yoke System so he used that to test different build configurations.
He then went to the Mannheim City airport (EDFM) and took measurements of a real Twin Otter to compare them to his plans. Returning home, he finalized the first version of the plans, had an artist render a visual mockup, and sent the plans to a carpenter. The carpenter cut separate pieces from medium-density fibreboard (MDF).
André sanded the edges of each piece so it was nice and smooth. MDF board is great for a simpit project because it is strong and relatively inexpensive. He pre-painted the center console and outer plates. He used 19mm MDF for the piece that became the base plate. The side plates were attached with carriage bolts.
The outer panels were painted and carpeting was cut to match the dimensions of the base plate. Angle brackets were attached to the plates with carriage bolts. The benefit of using carriage bolts for much of the assembly is that the entire cockpit can be easily dissembled if the unit ever has to be moved.
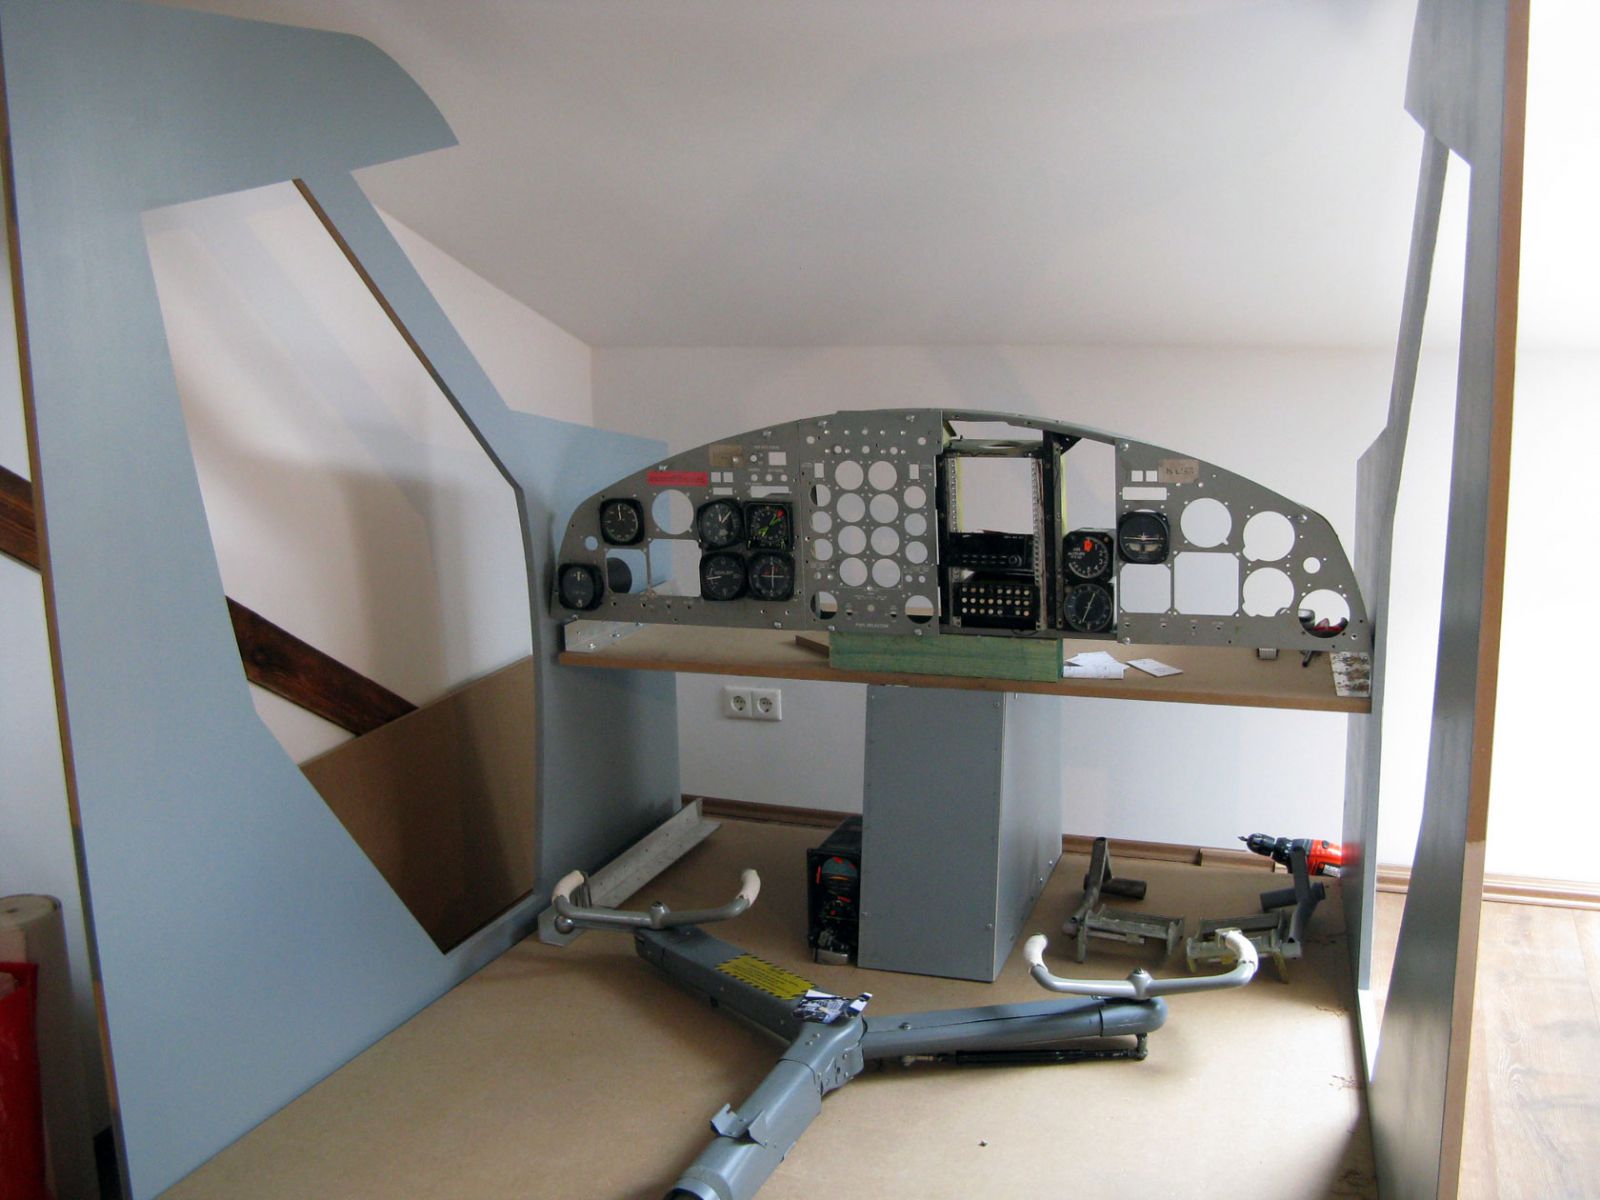
The main panel was then set-up in the shell and bolted in place. At this point, a dummy stool stood in for the eventual pilot seats. The dummy stool had the same dimensions of the real seats and was used to make sure that the seating was the correct height to the console. This allowed testing and reconfiguring as the cockpit was built to ensure it was all going to plan.
For that same reason, André set up a monitor and a side-mount yoke. This allowed him to take test flights and get the feel of the space. At this point, he also created some dummy gauges on photo paper and framed them with rubber rings to increase realism.
André continued to work on “Twin Otter 1” and liked the result. But he could see that he already wanted to start over and build an even better version. Soon “Twin Otter 2” was being planned and pieced together. He decided he wanted to incorporate bigger and better ideas.
The new simpit’s plans were created 1:1 to help create the most detailed panels possible. The frame was set off the ground to be able to mount the seats and the controller into the base. He used the same angle brackets and carriage bolts as last time to accommodate easy disassembly if needed.
This time he created the main panel that would accommodate twin yokes in the front. There is also a cutout to accommodate a computer keyboard for accessing quick keystroke shortcuts. He also included a GF autopilot module and assembled a toggle panel. DHC6 covers were attached to the MDF and dropped into the frame. Holes were drilled for the instruments and a panel was created for the middle section.
The side panels were ground down, sanded, and painted. He coated the interior with RAL 7001 and painted the outside with base white followed by the Twin Otter color scheme. The side panels were then attached to the base mount. The carpet was laid and Pro Flight Rudder Pedals would be added shortly after.
For seating, he was able to acquire a pair of used Opel Recaro seats. To mount them he had to create a carbon steel substructure above the floor. He was able to use a larger monitor this time around: a BenQ G2420HDBL 24-inch widescreen LED. Plans called for the same unit to be added to the co-pilot side. Once the BenQ was in place, he added overhead switches for cabin lights.
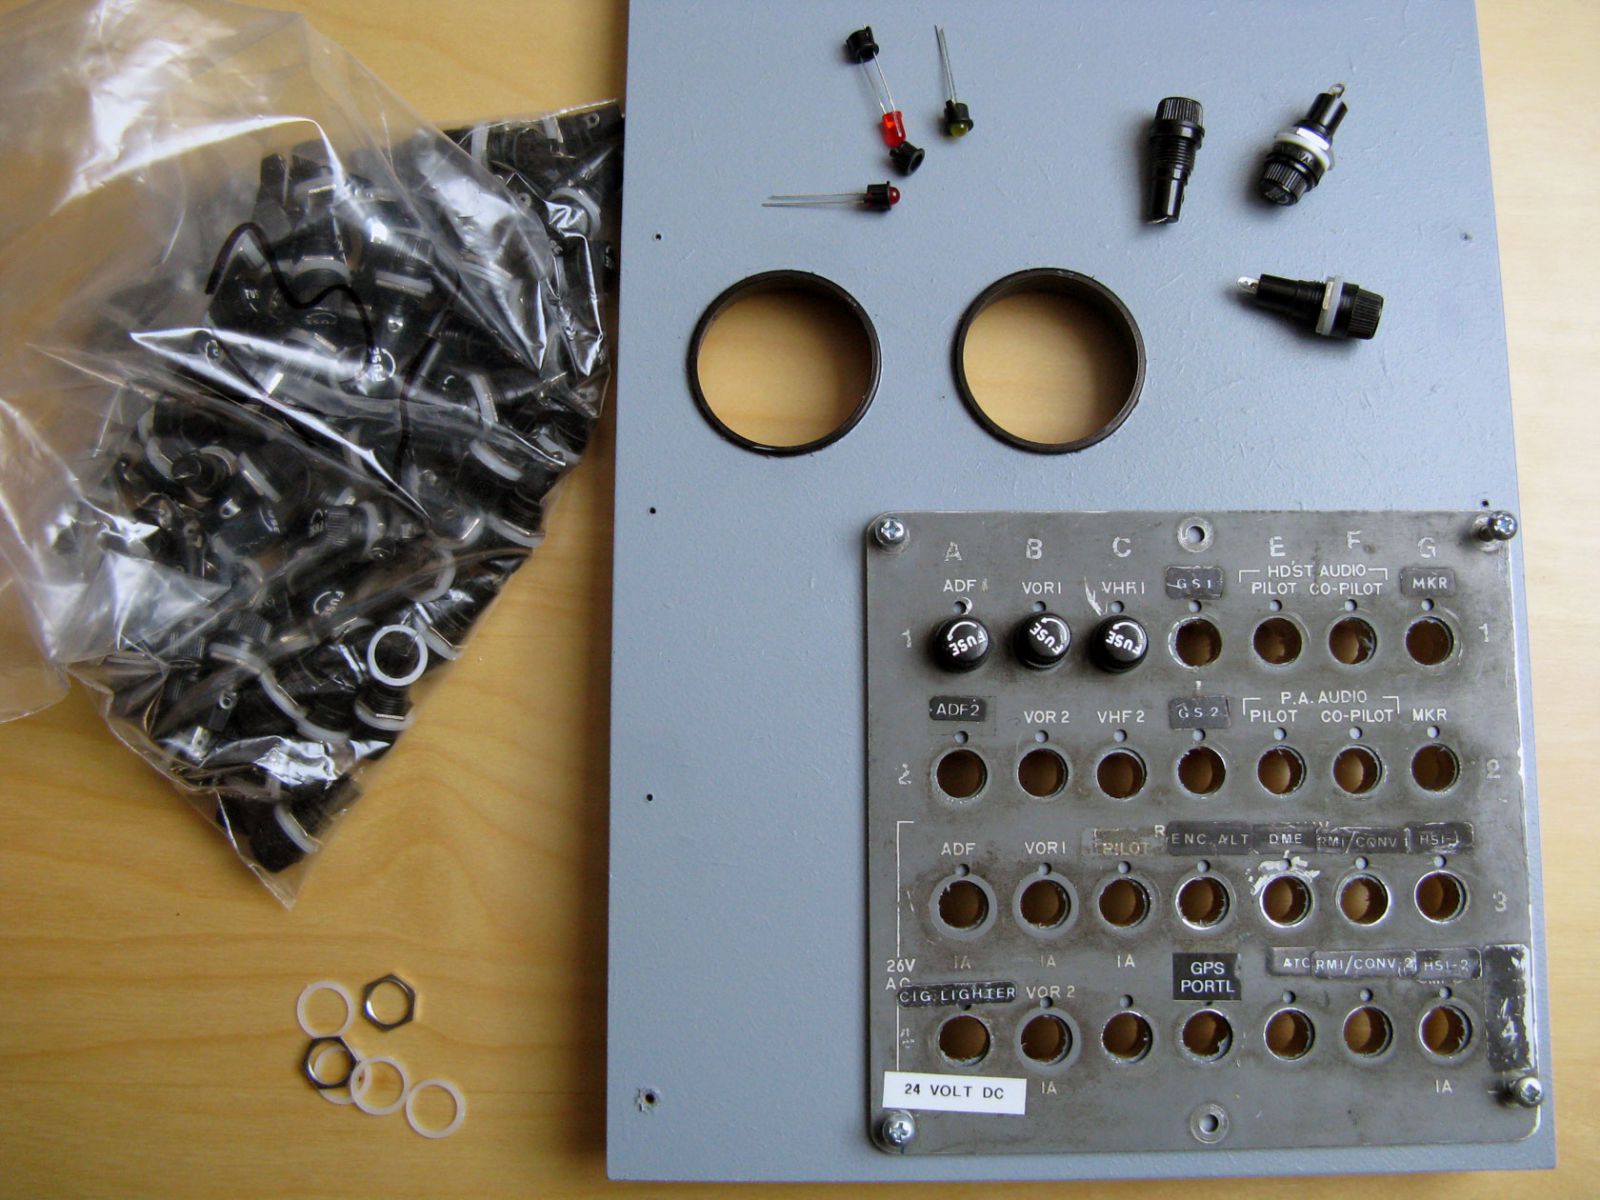
The middle circuit breaker located in the center console was fitted with fuse holders. The fuse box itself was designed in Corel Draw, printed, and transferred to a plate made of Plexiglas. André used a lathe to tap the fuse holders to get them to fit the plate. It was then covered and machined.
André added subwoofers and bass speakers behind the center console between the footwells. Later he would add two speakers behind the panel cover on the left and right side. He says you can actually feel the sound as well as hear it because the bass on the MDF bass plate creates vibrations through the entire cockpit. Several buttons and lights on the main panel come from an SYS3 board from Flight Decks Solutions (www.flightdecksolutions.com). The buttons pass their respective commands directly to the computer for processing.
Over the next few months, he continued to work on the instruments, electronics, lighting systems, panels, and the complex, interrelated systems that go into a quality home cockpit. He loves flying simulation more than ever before--and hasn’t dropped into the water off Tahiti once.
Clearly, both Twin Otter 1 and Twin Otter 2 were labors of love for André. He told FS Magazin he will continue to refine and improve his design and construction (Feb/March 2012). He advises anyone considering a similar project that it will take longer than expected. He worked on each simpit as time allowed after he met his work and family responsibilities. As a result, at times development was rapid or it might have slowed for weeks at a time. It’s important not to get discouraged and work on it as you can. Most of all, have fun!
André welcomes any input or feedback from readers. You can contact him directly at andre.aepfelbach@twinotter.de. He encourages you to keep up with his blog at www.twinotter.de (German). You can also check out his Facebook page at www.facebook.com/Twinotter.Homecockpit
Equipment and Parts
For additional reference and background, here is a list of some the equipment and parts André used:
Software
Software André uses includes:
Flight Sim Packages:
Various Scenery:
Additional Add-ons:
Additional Tools:
Unless you are flight simulation enthusiast—then you understand. If you have ever wanted to build your own flight simulation home cockpit, you’ll be interested in these interviews. Patrick Kneissl, Fabio Ippoliti, and Christof Sautter are all home cockpit enthusiasts. Each is building a custom Boeing 737 flight deck. We met up with them recently to find out more about their home cockpit obsession and what lessons they can teach anyone considering building their own.
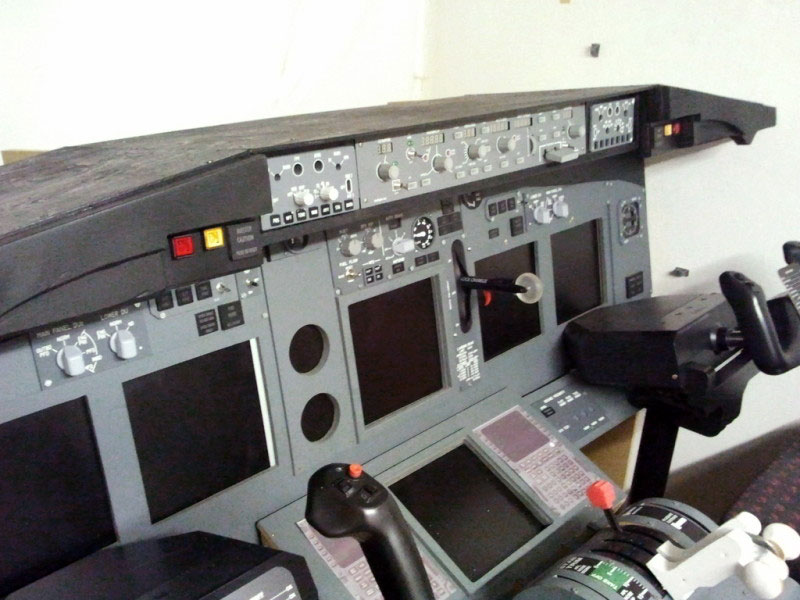
Patrick Kneissl has been interested in aviation since he was a youngster. Although he never made it a profession, he has built it into a serious hobby. He explains why he chose the Boeing 737 to build his home cockpit. “The simple answer is that it is a beautifully crafted airplane. Boeing created a beautiful interior which extends all the way into the cockpit.”
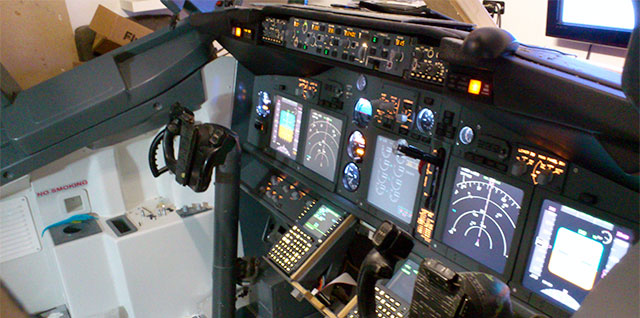
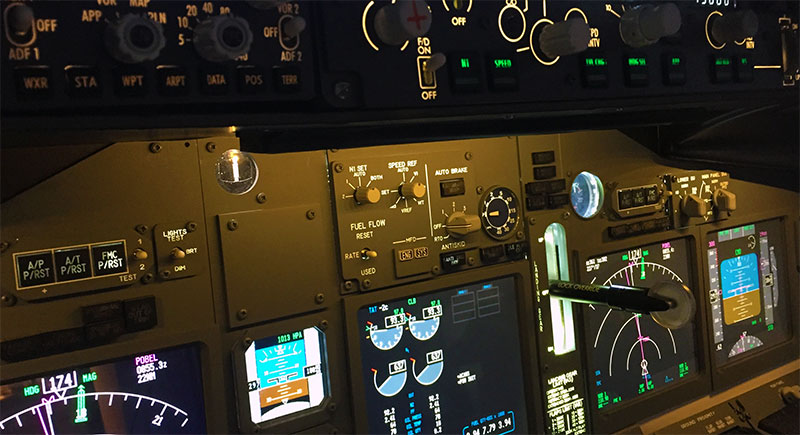
Patricks's setup with glass display lights illuminated
He has been working on the cockpit since December 2010. “My goal is perfection,” he said directly. “Every detail must have distinct functionality.” Perfection takes time, however. “It’s ready when it is ready. In any case, the way is the goal!” he said. This is a theme we heard repeatedly from these home cockpit kings: the journey is the reward.
What skills do you need to complete one? Kneissl said, “Only one—you must really want it and to see it grow. It does help to know a little bit about building materials and materials. And good PC knowledge is essential. Buy you can learn most of what you need once you get the project started.”
Kneissl has a tough time finding source parts in Italy because there is no scrap industry for aircraft. He gets most of his parts from abroad- Indonesia and the United States.x
The 737 is one of his three favorite planes. The others are Lear jet and the Cessna, “simply because it is a nice plane and a lot of fun to fly—although I don’t own one!”
At this point, he spends most of his time building and not flying. As soon as the 737 is functioning, he plans to spend more time in the captain’s seat. Currently, he runs the simulator on FS 9. In the future, he plans to have FSX and X-Plane available as options as well.
Fabio Ippoliti’s interest in aviation took root in 2005 during his last university exam. The test was on Secondary Radar and its application to Air Traffic Control. “During the exam preparation, I was researching ATC information on the web. That’s when I discovered Fight Simulator 2004 and its ATC features. Right then I started to fly sims regularly and made plans to build my flight deck.”
Ippoliti is a Satellite System Engineer in the “Radar and Earth Observation” Business Unit at Thales Alenia Space – Italy. There he improved his knowledge in the RF and Antenna field by working in national and international programs in cooperation with high-profile aerospace agencies and industries. He explained, “Even if my job is not directly correlated to the aviation, my university degree in Telecommunication and Aerospace Engineering permitted to me to have a good knowledge of the aviation world.”
Why did he choose the Boeing 737 for his project building adventure? He said, “I chose to build a 737NG cockpit for a few reasons. First, Boeing is an American jetliner and I love American aircraft. Also, the 737 is equipped with a couple of yokes while the AIRBUS, for example, uses a sidestick. My concept of airplanes is to fly using a yoke.”
Like Kneissl, he gets his parts from multiple sources. He said with the Internet, it is possible to get parts from all over the world. The downside is that the shipping, VAT, and custom taxes are high. As far as any special skills needed to build a home cockpit, he said no particular skills are required although it helps to have an understanding of computer science and Technical English, as well as a penchant for DIY.
How much has he spent on the project so far? “It’s a secret!” he laughed, “but since my wife will not read this interview I can provide you the real cost! Cockpit construction is a very expensive hobby. For example, I paid about 35.000€ for my simulator including new hardware, software, cockpit parts (both homemade and used), equipment—and that doesn’t even include man-working hours! Another 1.500€ are required for its completion.” He said that if you can accept a cheaper cockpit, 10.000€ could be enough to get it all done.
We asked him his choices for three favorite aircraft. “737NG-800, 737NG-800 and 737NG-800!”
Okay, fair enough. But why? He answered, “Because I love the 737NG-800!” It doesn’t get much clearer than that.
Fabio's website can be found here.
Christoff Sautter began his love affair with flying as a child. Everything about flying interested him, especially airplanes. Although he doesn’t work in aviation, he started with Microsoft Flight Simulator early on—first the FS98 edition, then FS 2000, FS 2004, and now he runs FSX.
Three years ago, he got the idea to build a cockpit—a Boeing 737. “It’s perfect for a simulator because there are many parts to buy and building it is a challenge! But mostly, it is a great aircraft,” Sautter said.
He’s worked on it for about 2 years and expects that 6 more years will pass before it is completed. He makes many parts himself to keep costs within limits. Still, he has put around 5-6000€ into it and figures it will total around € 15-20000 by the time he is done. He buys lots of wood, plastic, metal and vast amounts of pre-built panels (pedestal, overhead, MIP, etc.)
His collection includes toggle switches in all shapes and thousands of LEDs. Additional purchases over the years include flight controllers to control the action and USB cards to connect to the switches. Finally, he has invested a lot in software including FSX and many additional programs. Like the others, he gets parts from other countries- Holland, America, Spain, and Belgium.
Sautter tries to fly his simulator twice a week. “If I do not fly, I'm building!” he said. “It always depends on the time. It's just a hobby.” Here are some of his current computer configurations:
All his computers and Ipads Netzwek are linked.
What are his three favorite aircraft? “The Boeing 737 is simply ‘the’ aircraft. I cannot explain it but I love this airplane. I also like the Airbus A320 because it is closest in size to the 737. But I'm not on joystick control. I need a good old yoke. Nevertheless, the A320 is a beautiful airplane. Finally, I like the Cessna (all types). It is perfect to enjoy the countryside in a quiet VFR flight.”
Flight Simulation fans understand the connection to certain aircraft. They feel right at the very beginning and each flight deepens the connection. They get to know the nuances of its handling and touch—how it reacts in a wide variety of weather conditions, how it feels on takeoff and landing.
For Kneissl, Ippolitti, and Sautter, that aircraft is the Boeing 737. As Sautter says, it is “the” aircraft. That’s when you know a certain plane is the right choice to build a home cockpit. You love it so much you look forward to working in it a little each day—for years on end.
Below you can see two video examples of the lengths people go to create the perfect simulator.
While many virtual pilots will be undoubtedly happy to simply take to the skies via their comfy chair in front of their computer, performing virtual flight missions from a semi-professional setup, without a doubt, increases the experience ten-fold, making perhaps as authentic and realistic as possible without setting foot inside a real plane.
Of course, whether you choose to build your own from scratch or purchase one already fully built – or a combination of the two – a home cockpit it will undoubtedly enrich your overall virtual flying experience. It will, however, also lighten your bank balance, whichever route you choose.
With that in mind, and particularly for those wishing to build their own but with little experience and limited funds, perhaps a joint effort with a small team of flight simulation enthusiasts is the best way to go, assuming of course, the logistics such as where it resides, who has access to it and when can be worked out.
One more thing to consider is the future of flight simulation. We have, for example, touched on the potential for virtual reality to intertwine with flight simulation technology to increase the reality of the experience once again. There are already some such programs available in educational programs (to experience bombing raids during World War Two, for example). It is surely only a matter of time before such widespread rollout of virtual reality to home, recreational flight simulation. Combined with a setup that moves, tilts, shakes, and replicates everything else that a pilot in a real plane would experience, the future for flight simulation looks exciting, to say the least.
Whatever is the best option for you, once you take to the skies in the authentic environment of your own virtual cockpit, you are unlikely to (virtually) fly any other way again.
Please do comment using the comments section below! Have you built your own cockpit? Are you considering building one? Was this article helpful or useful to you? Don't be shy - let us know your comments.
Upgrade Microsoft Flight Simulator, FSX, P3D & X-Plane in minutes with our curated file library packed with aircraft, scenery, liveries, and utilities.
Ready to upgrade your hangar?
Browse the free file library
Ian Stephens is a flight simulation industry expert with over 20 years of experience and also has a keen interest in aviation and technology. Ian spends a lot of his time experimenting with various simulator packages but has a love for Microsoft Flight Simulator X because of the huge selection of add-ons available. However, Ian also has copies of Prepar3D and X-Plane installed.
Ian has been writing for Fly Away Simulation for over 9 years. Should you wish, you can contact Ian via email at ian.stephens@flyawaysimulation.com.
Microsoft Flight Simulator X: Steam Edition arrives with upgraded performance, updated netcode, and seamless mod support, uplifting the…
Ever wondered how comprehensive flight simulation really is compared to genuine cockpit time? This article delves into how advanced…

Pro Flight Simulator is effectively a renamed iteration of the free FlightGear platform, raising interest among virtual aviation fans…
Experience significantly smoother visuals and improved performance in FSX with this DX10 Scenery Fixer, a specialized solution that…

This comprehensive add-on merges realistic pilot-to-co-pilot interactions, multilingual cabin announcements, and dynamic flight phases for…
Enthusiasts can discover how Flight Sim World emerged from FSX’s core technology, introduced robust 64-bit performance, and evolved with…
Comments below are the opinions of the individuals posting them and do not always reflect the views of Fly Away Simulation. We moderate all comments manually before they are approved.

I have read and admired this piece of work. Bravo Andre. I happen to be a virtual world pilot planning to start building a home cockpit, my choice is a Boeing 737-800.

Airline Captain 36 years, with 20,000 hrs. Big stuff 727, 737, Connie, DC-6&7, DC-8 61 & 62, Viscount, DC-3 With Wight engines, Light stuff Champ, Stinson 108,PT-23, BT-13, Bambo Bomber UC-78,Cessna 140, 172,175,182, T-craft on floats, Piper Cub, and Tri Pacer Pacer, Ercoupe. I use Flt Sim 9, I love the first, Just Flight 727, As I flew it for 13 years. The program is the most realistic all around. Please write, would love to exchange ideas + I flew many more planes than listed, Soloed in 1951

Well done André, you must be either single or be a most understanding lady, if the latter does she have a sister?

Good work André. I would love to have motion simulator of a fighter jet. Would you know where i can get one. Cheers, keep up the good work

Thanks Ian for this great article.

Thanks for interview opportunity and stay tuned on my web site www.737homecockpit.com
Capt. Fabio Ippoliti

Thanks for interviewing, too!
best regards
Patrick

I am really interested in how you came to make the desktop version of your cockpit. I'm not the "handyman" type that can easily build something, but am looking for the best immersion I can get with plug and play devices. Could you provide some more detail regarding your desktop cockpit?

Hi
I stranded here since I just developed the idea of building my own cockpit. I run X-Plane 10 with a Matrox Triple Head 2 Go on 3 27" Monitors with Yoke, Pedals etc. from CH Products and some stuff on iPads - but its just not feeling good enough. I am flying B737, A320, T7 and CRJ200. I am really impressed by what you guys are doing there and I am keen to learn from you. My current layman's questions are: 1. Where do you get the Cockpit Layouts for the planes? Where do you buy the instruments? How do you get these instruments running with your FlightSim? Sorry for these basic questions, but help would be very much appreciated... Greetings from Shanghai, Mathias

Wish one of those guys live here in Birmingham, Alabama, i would love to go over to there house and fly with them.

hai,
actually we want to build flight sim in brunei. if u can quote me for the flight simulator that will be very good.. 1. quotation for single seat for simulator 737-400 2. picture.
thanks, fadhli sulaiman

Hi, I have just joined. Being very interested in the home build, how is progress on this device and have you completed it, do you have photos and videos. Thanks


Hello there,
I am interested in setting up a flight simulation center for young people to look at an alternative way of teaching responsibility, focusing, maths, an even a future career, in a community that lacks special privileges. This center would be a form of Arts.
Would be much interested in any help that I can receive to kick start and sustain this program.
Thank you kindly.

Do you build 737 throttle quadrants? Any plans or instructions?

Looking for a desktop mounted trim wheel - has anyone ever found one?
I have the CH yoke with trim, but for hands-on would really prefer a trim wheel.

Hi, guys need some help building a 737-800 home cockpit simulator for my son. He only has his computer at this point.

Hi
Amazing boosting for getting a simulator made for me but actually feel shy in asking if could provide help in building up C172? Between all the talks of Jumbos mine is a baby only. Have read many articles and sites but since I am from India, where to start is a big question.
Thanks.